Exterior Waterproofing
Step by Step
Follow a real exterior waterproofing project through every phase — inspection, excavation, membrane application, drainage, and backfill. 8 days, 14 steps, 18 photos, zero mystery.
Water seeping through foundation crack

Fully waterproofed, dry, and protected
Phase 1 of 5
Inspection & Assessment
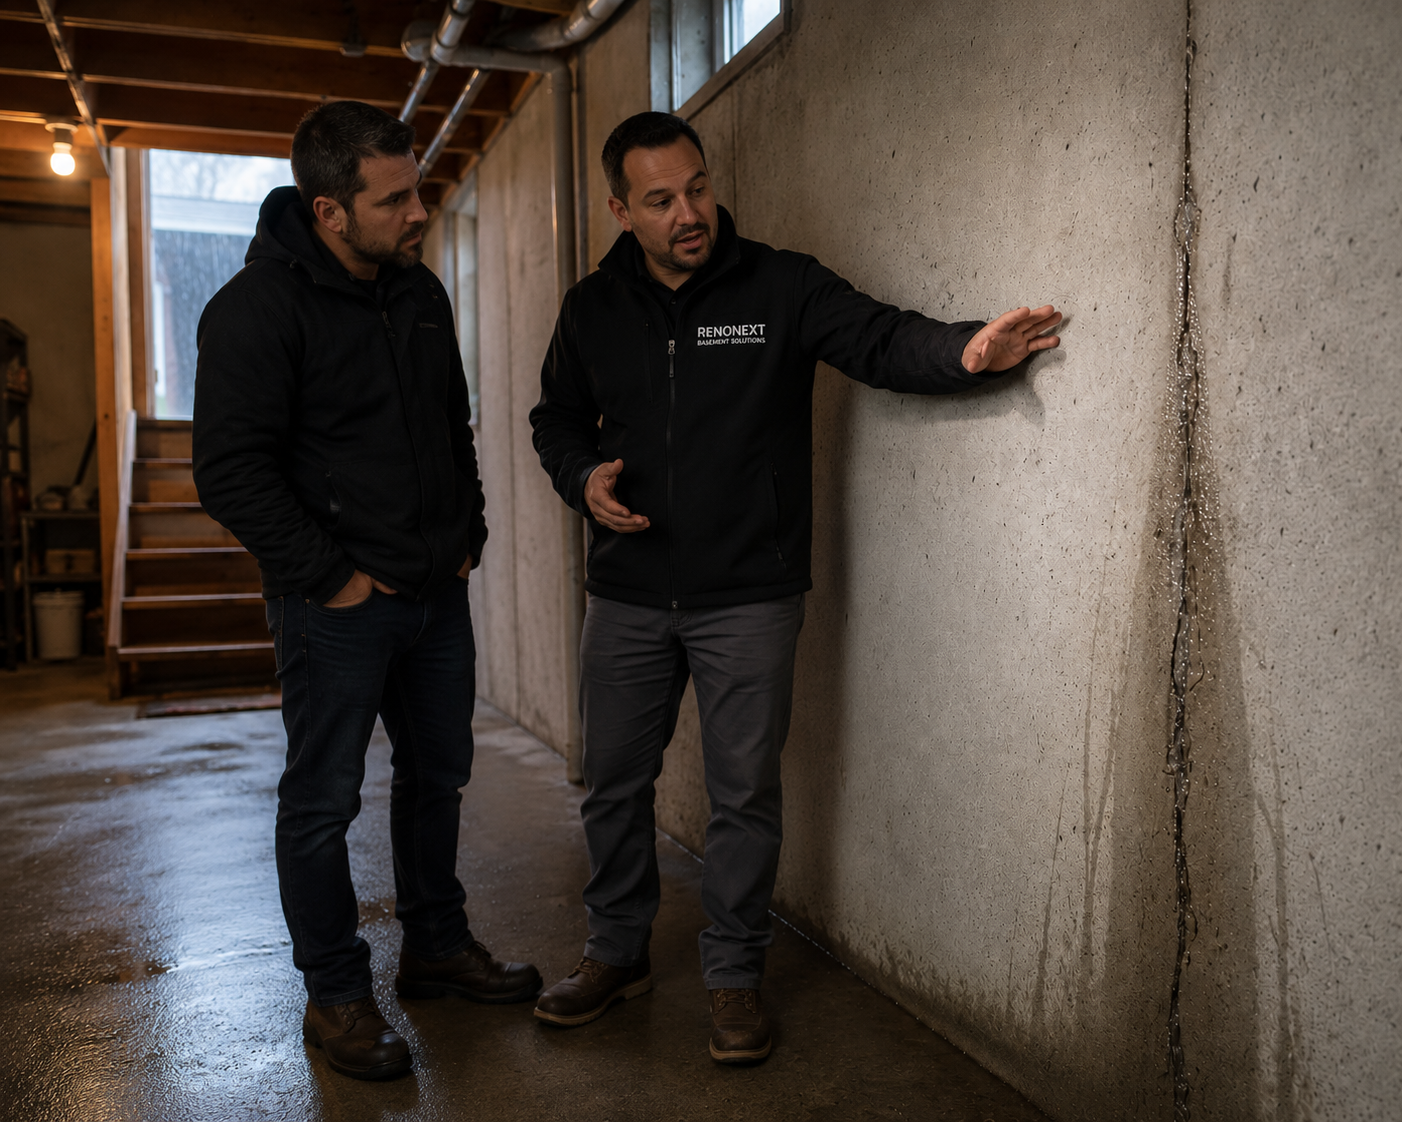
Visual Inspection — Water Seeping Through Crack
The project begins inside the basement. Water seepage through a visible wall crack confirms the problem — moisture is actively penetrating the foundation. This tells us exactly where the exterior waterproofing needs to focus.
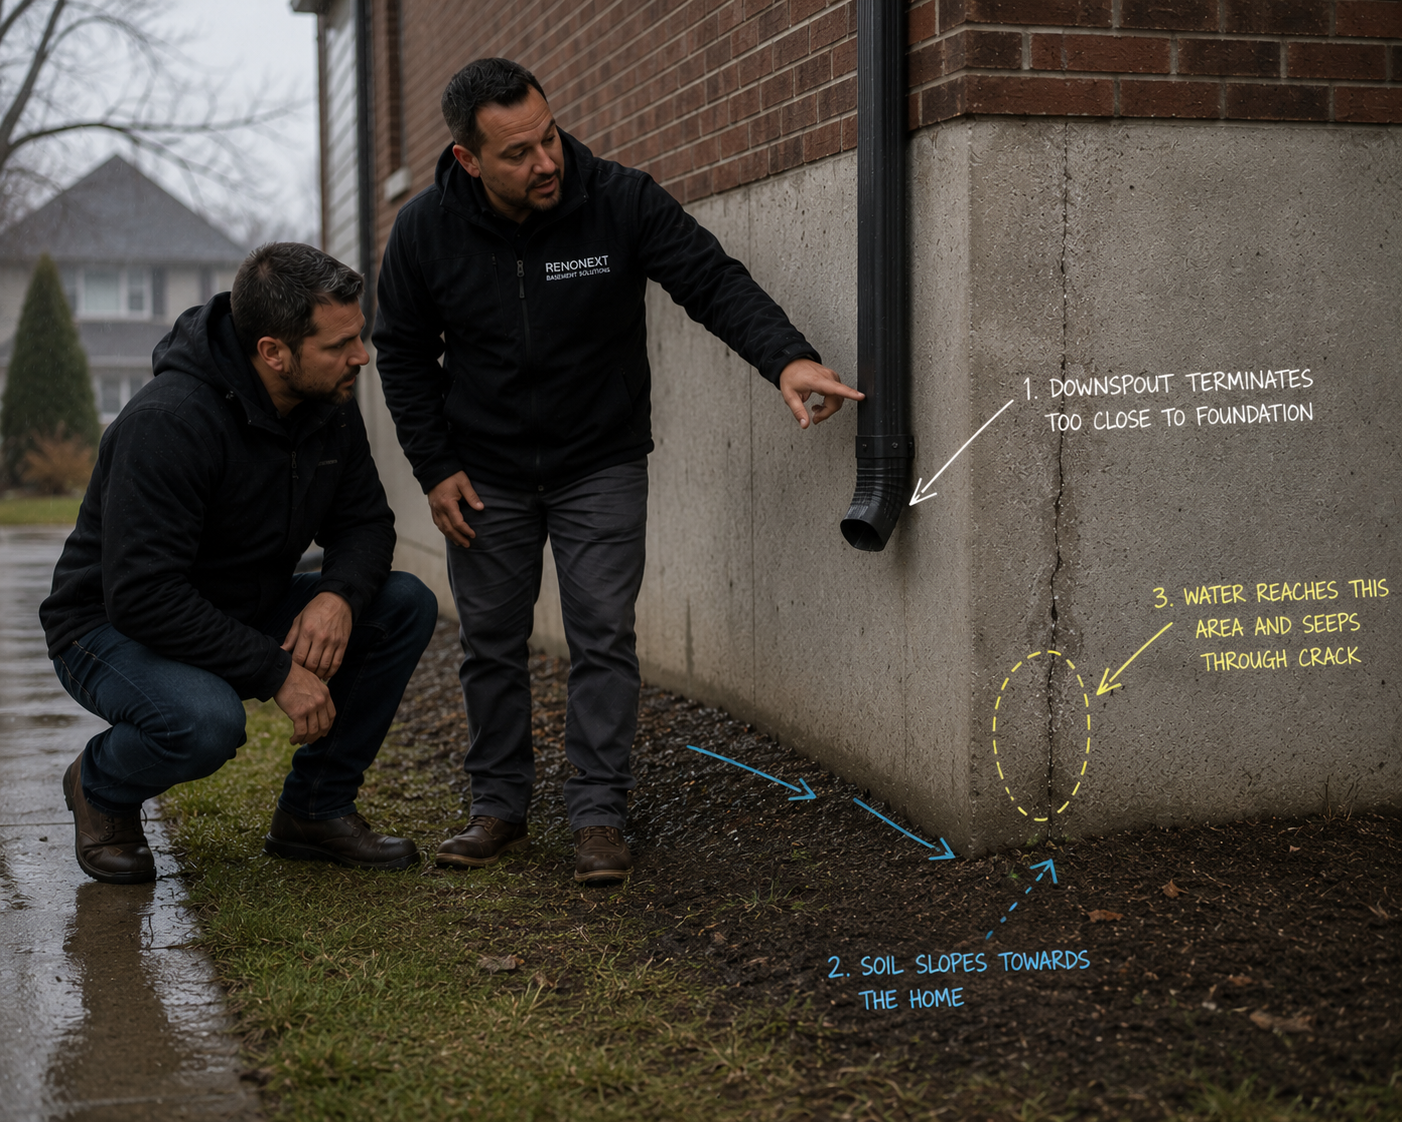
Outside Inspection — Identifying Crack Causes
Moving outside, the crew inspects the exterior to identify the root cause. Soil settlement, tree roots, poor grading, or hydrostatic pressure — understanding the cause determines the waterproofing approach.
Phase 2 of 5
Excavation
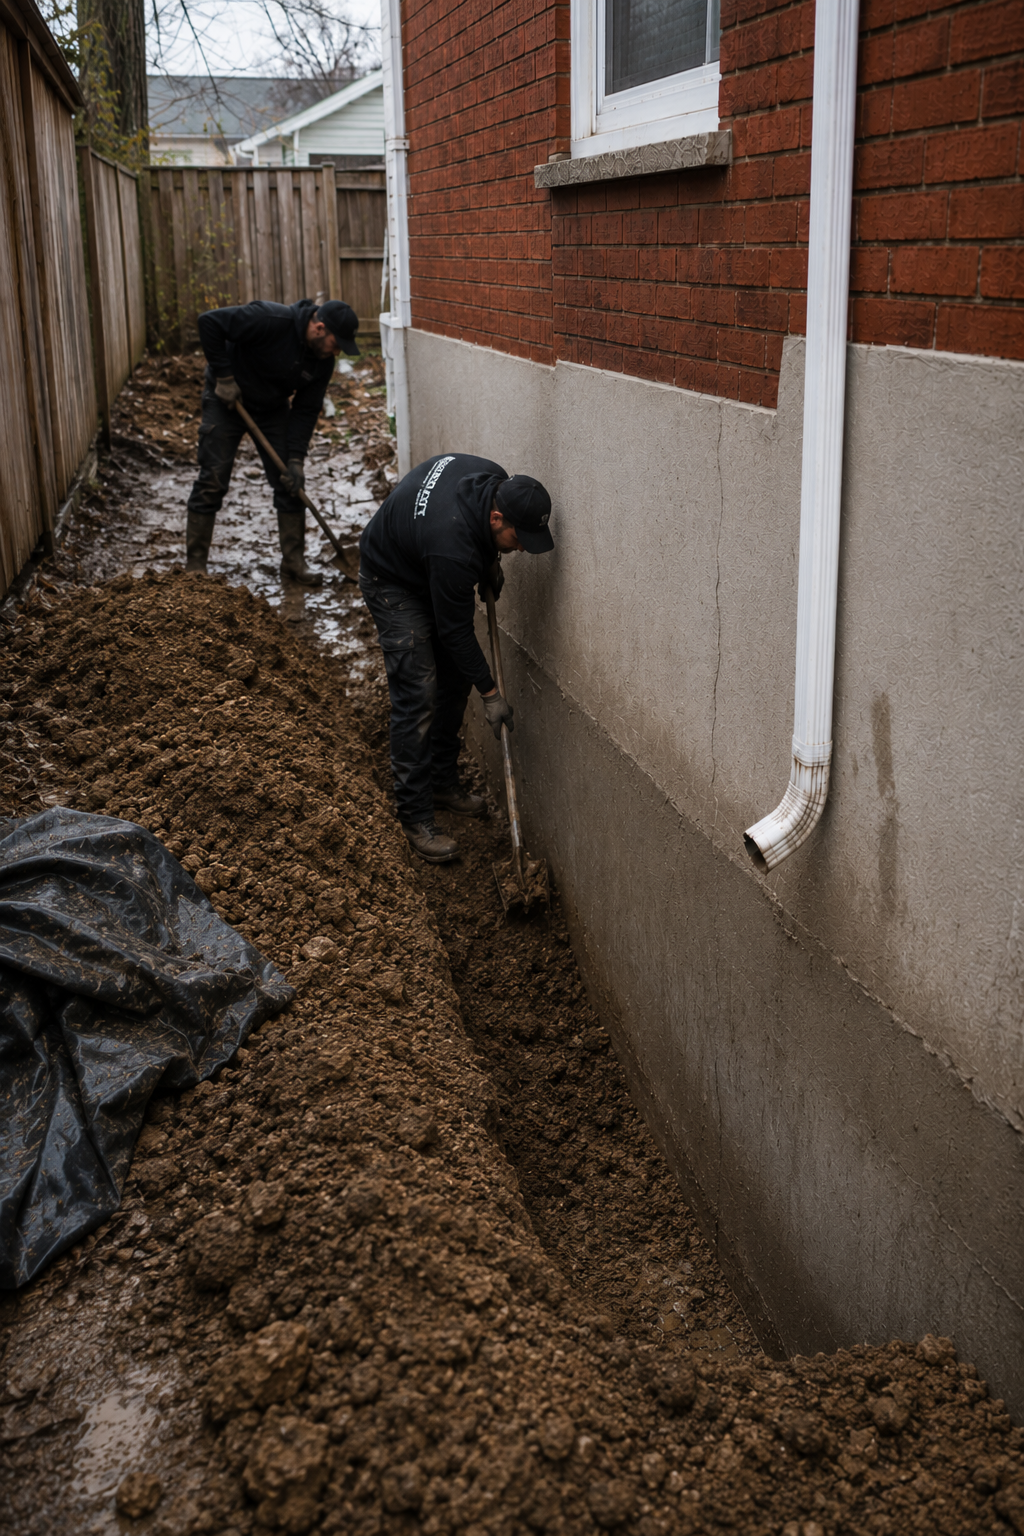
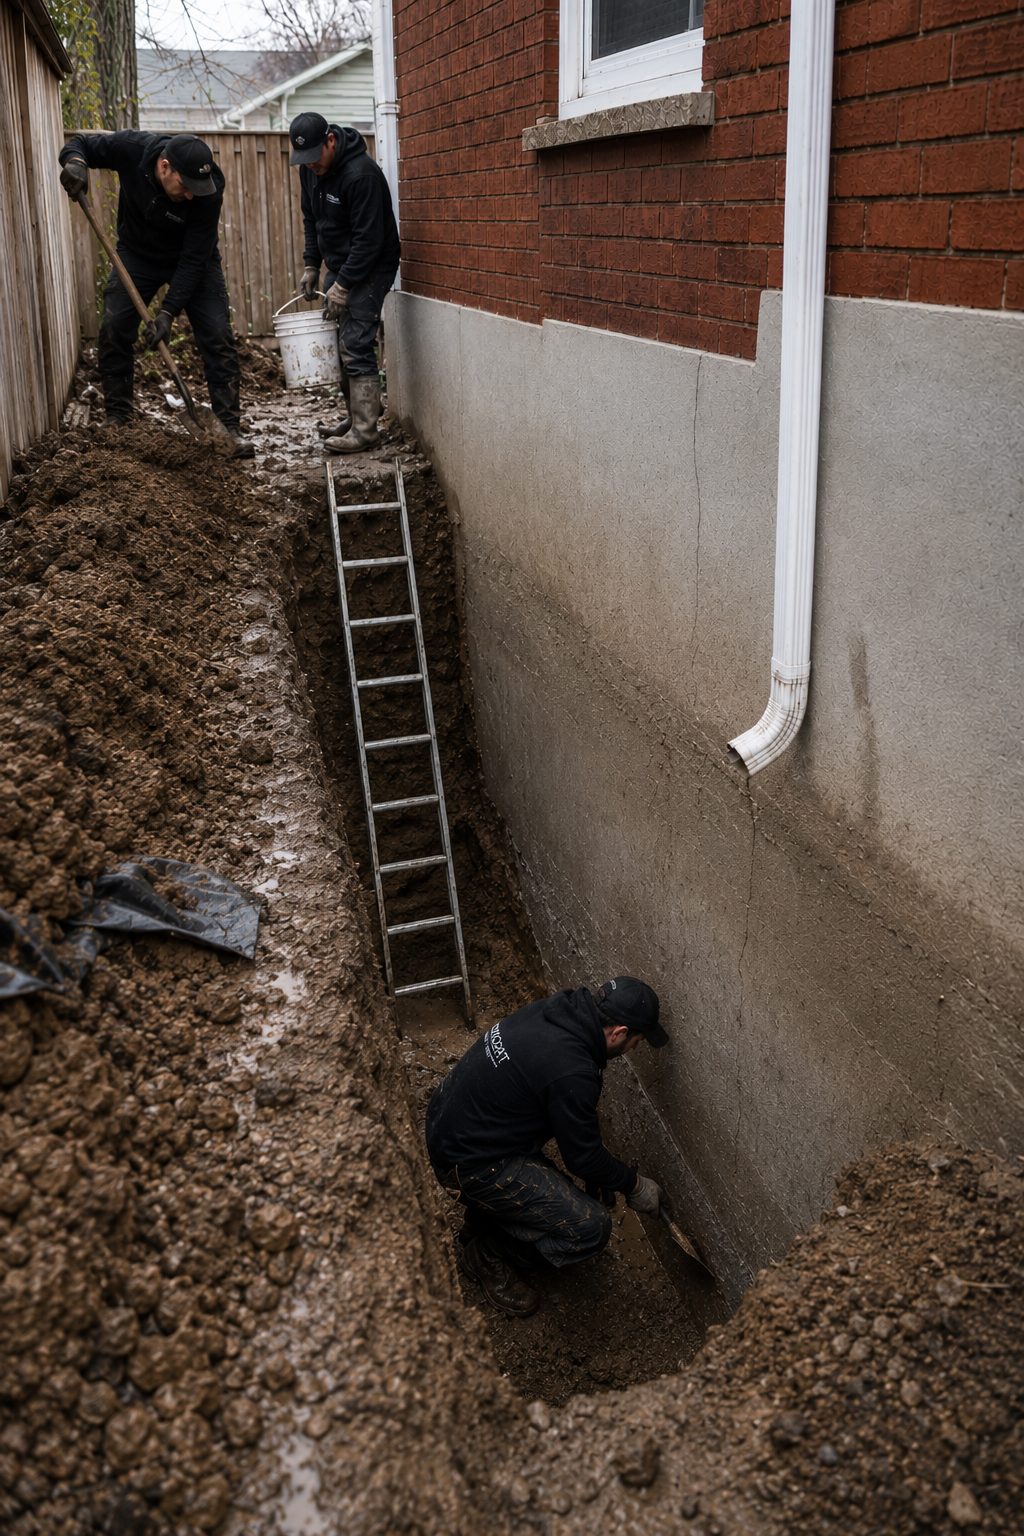
Excavation depth depends on wall height and footing depth. Typical residential walls require digging 6–8 feet down to expose the full foundation. Soil is stockpiled nearby for backfill.
Excavation to Expose Foundation Wall
A trench is excavated along the exterior foundation wall, exposing the full height of the wall down to the footing. This gives access to apply waterproofing materials directly to the concrete surface.
The trench is typically 3–4 feet wide to give workers safe access. Shoring may be required for deep excavations per OHSA regulations.
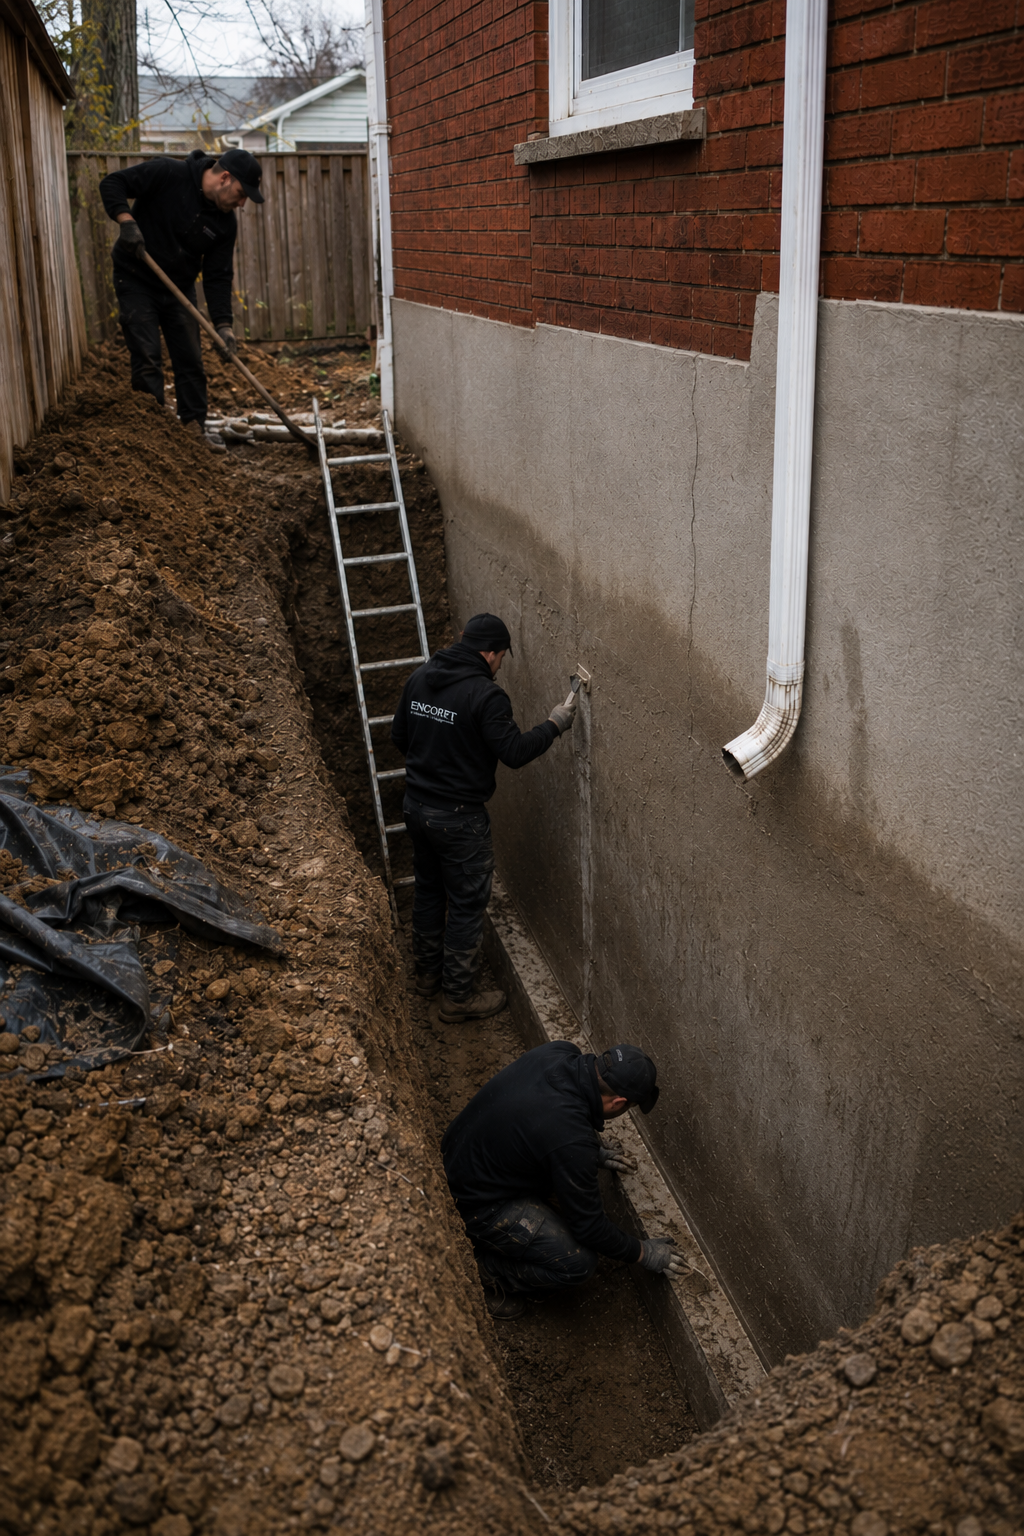
Cleaning Wall from Dirt & Debris
The exposed foundation wall is thoroughly cleaned — all dirt, clay, roots, and loose material are removed. A clean surface is critical for the waterproofing membrane to bond properly.
Phase 3 of 5
Waterproofing Application
The liquid membrane needs to cure before the poly layer is applied. In warm weather this can be same-day; in cooler conditions, allow 12–24 hours between coats.
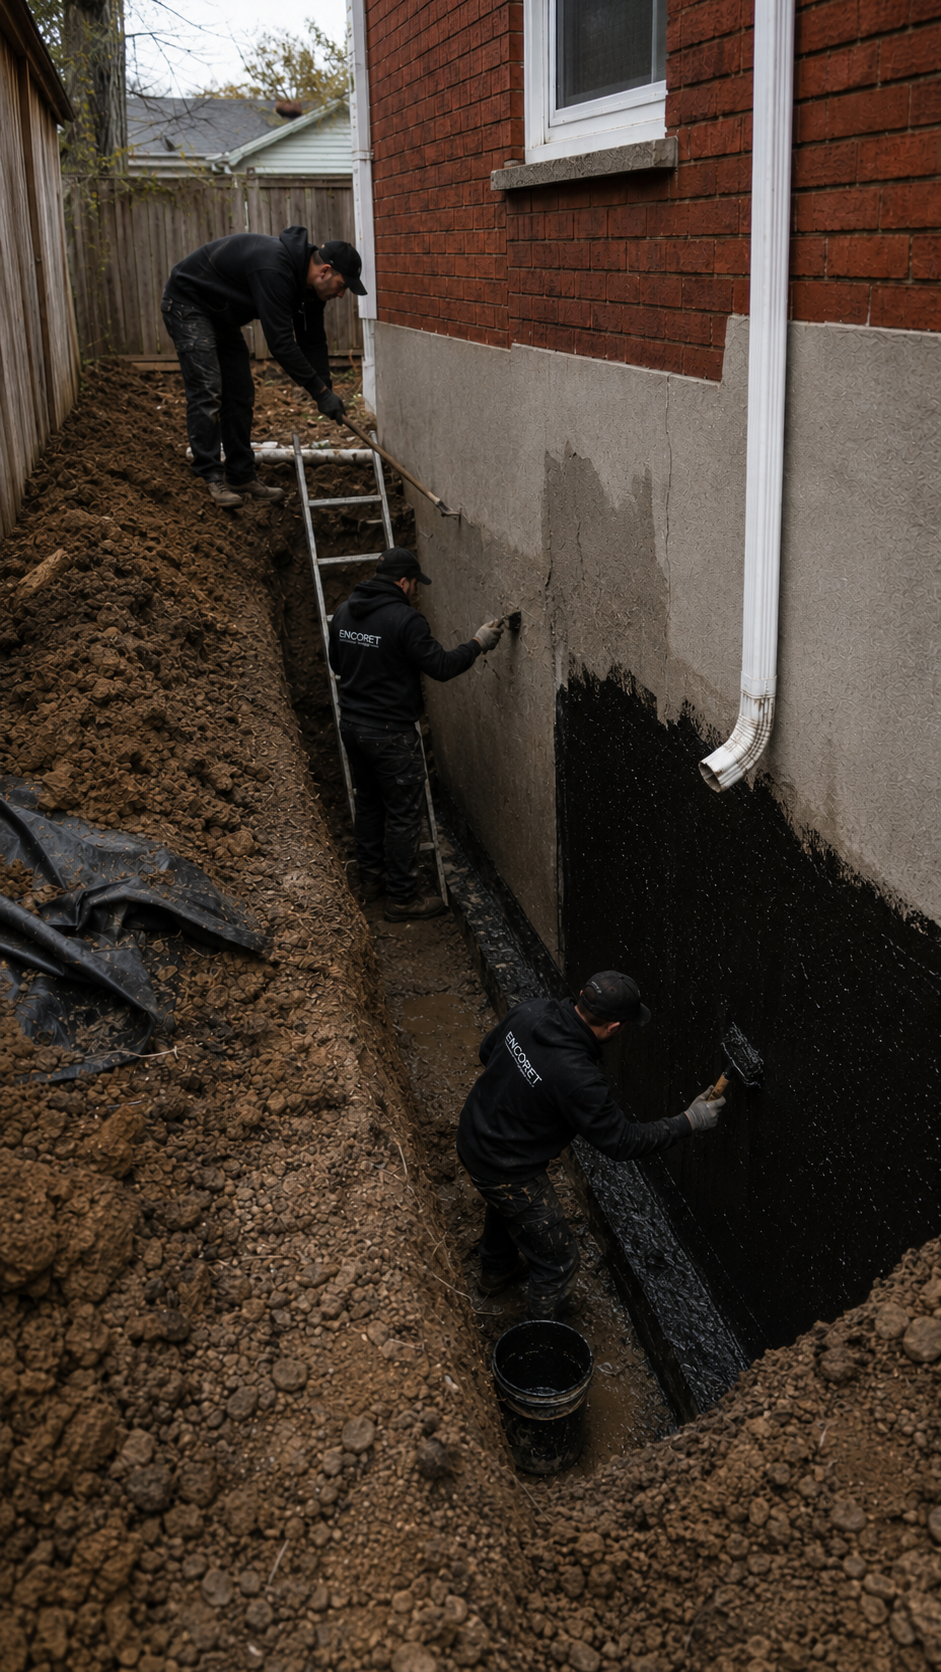
Applying Liquid Waterproofing Membrane
A rubberized liquid waterproofing membrane is applied directly to the clean concrete wall. This creates a seamless, flexible barrier that bridges hairline cracks and prevents water penetration.
The membrane is typically applied in two coats for full coverage. It remains flexible after curing, so it won’t crack with normal foundation movement.
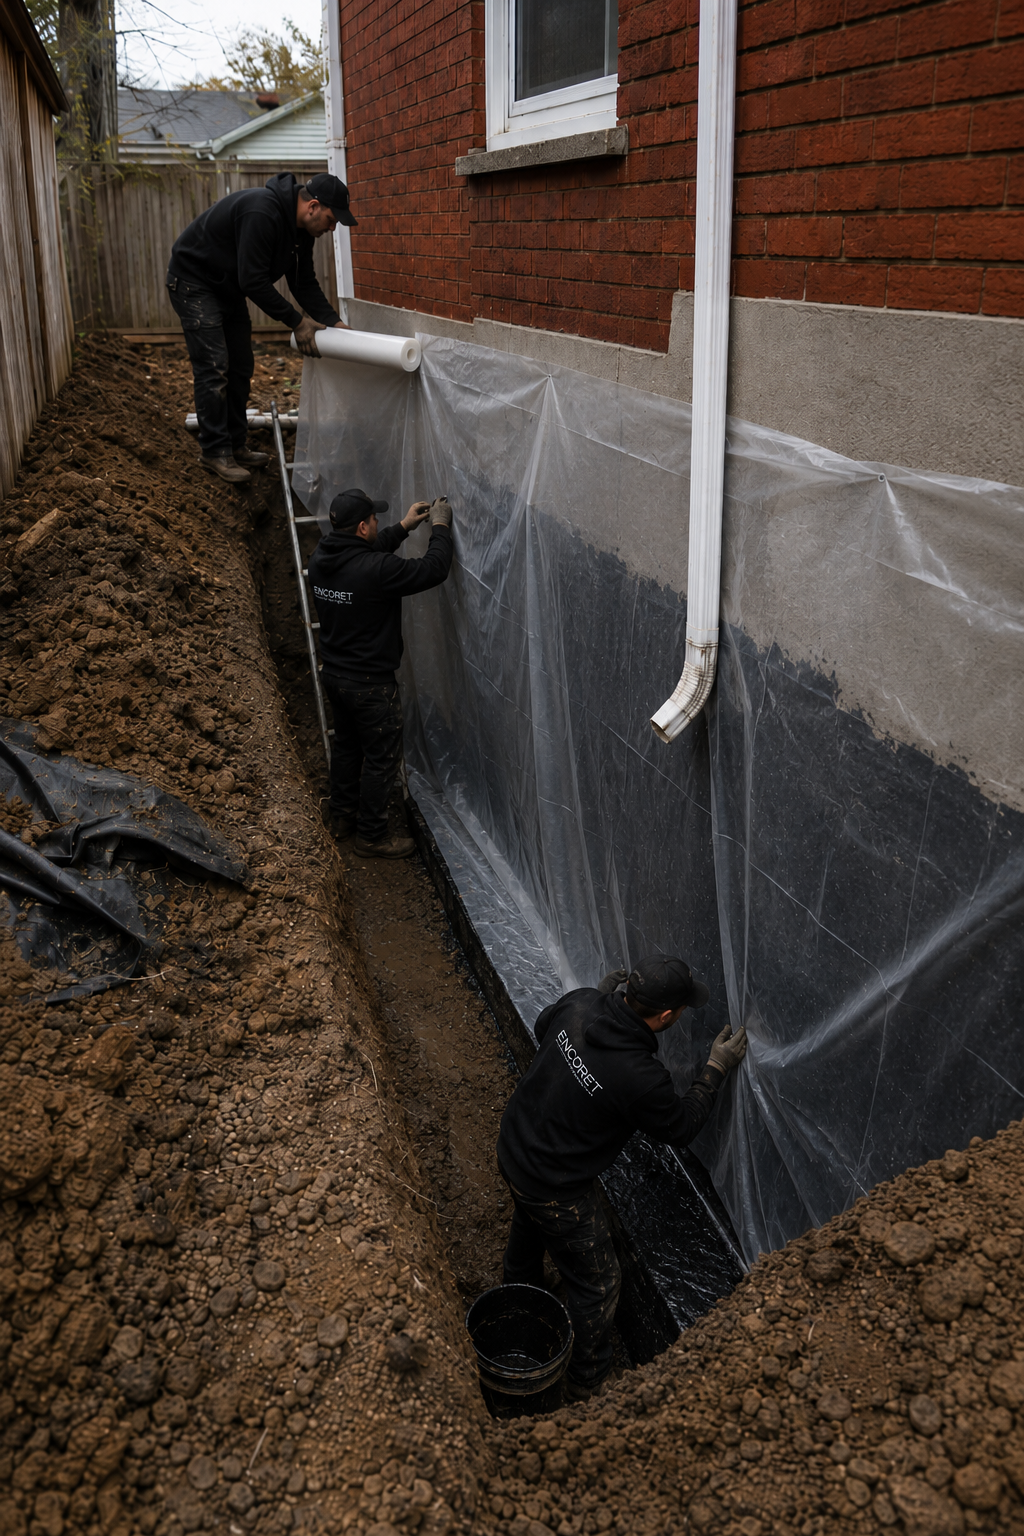
Covering with 6 Mil Poly Vapor Barrier
A 6 mil polyethylene sheet is applied over the cured membrane as an additional vapor barrier. This double-layer system ensures no moisture reaches the foundation wall from the surrounding soil.
Phase 4 of 5
Drainage System
The drainage system works together with the waterproofing membrane — the membrane stops water at the wall, while the weeping tile and gravel redirect groundwater away from the foundation.
Installing Perforated Drainage Weeping Tile
A perforated 4-inch weeping tile (drain pipe) is laid at the base of the footing, wrapped in filter fabric to prevent clogging. This pipe collects groundwater and directs it away from the foundation to a sump or storm drain.
The weeping tile is sloped at a minimum 1% grade to ensure proper drainage. It connects to either a sump pump inside or daylight at the property line.
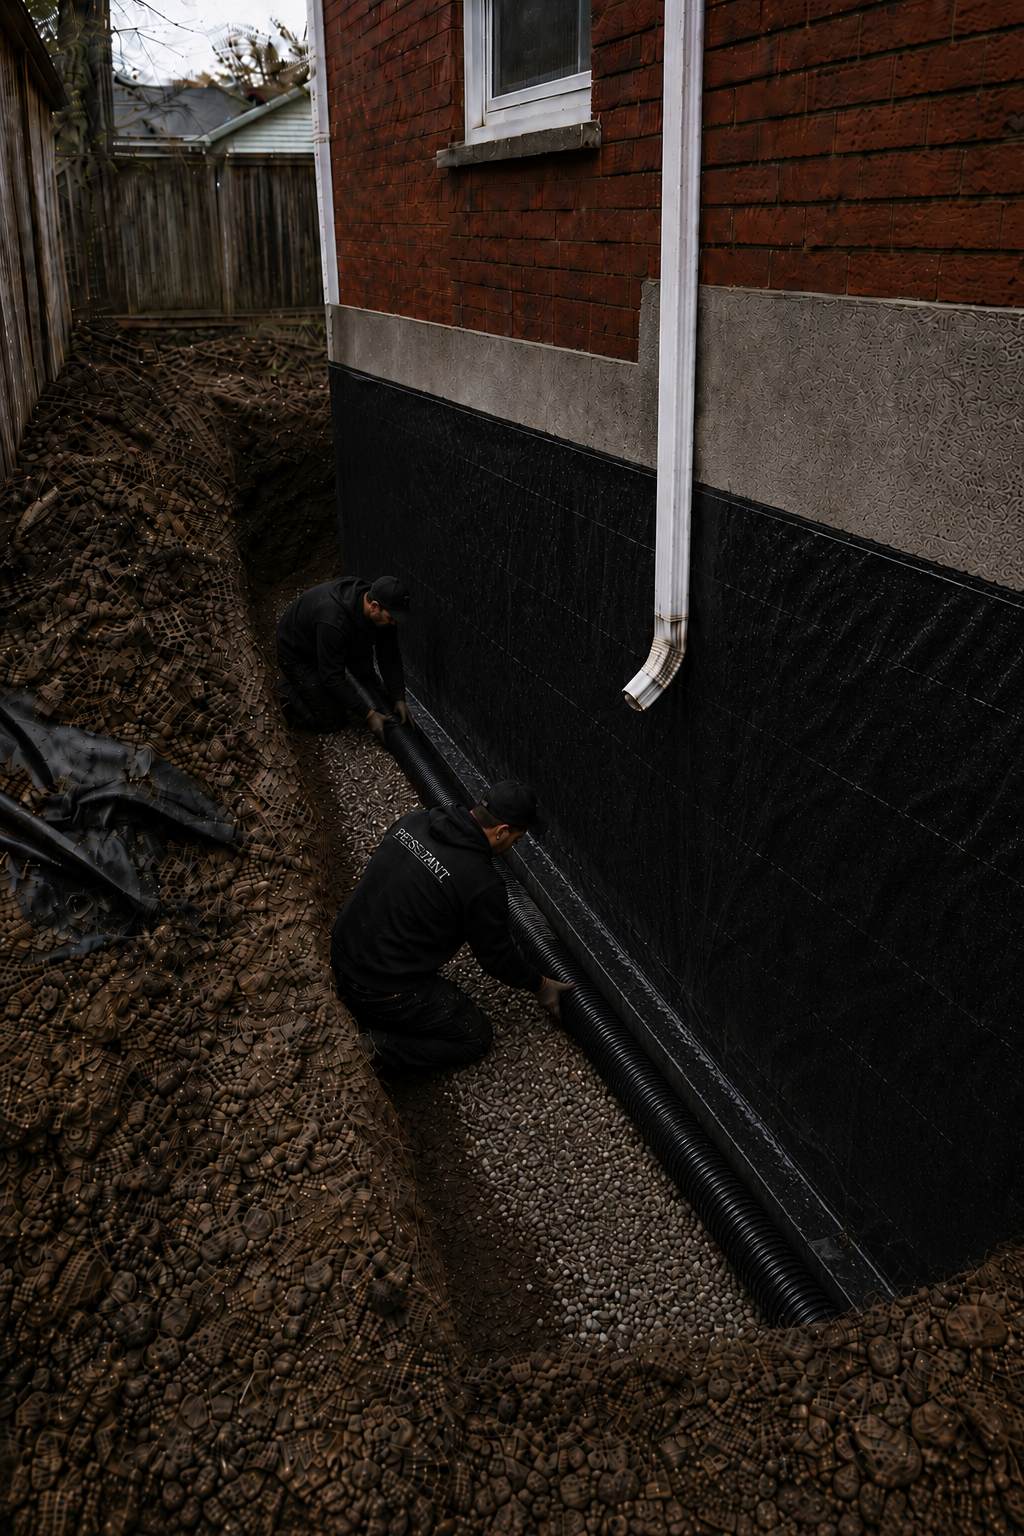
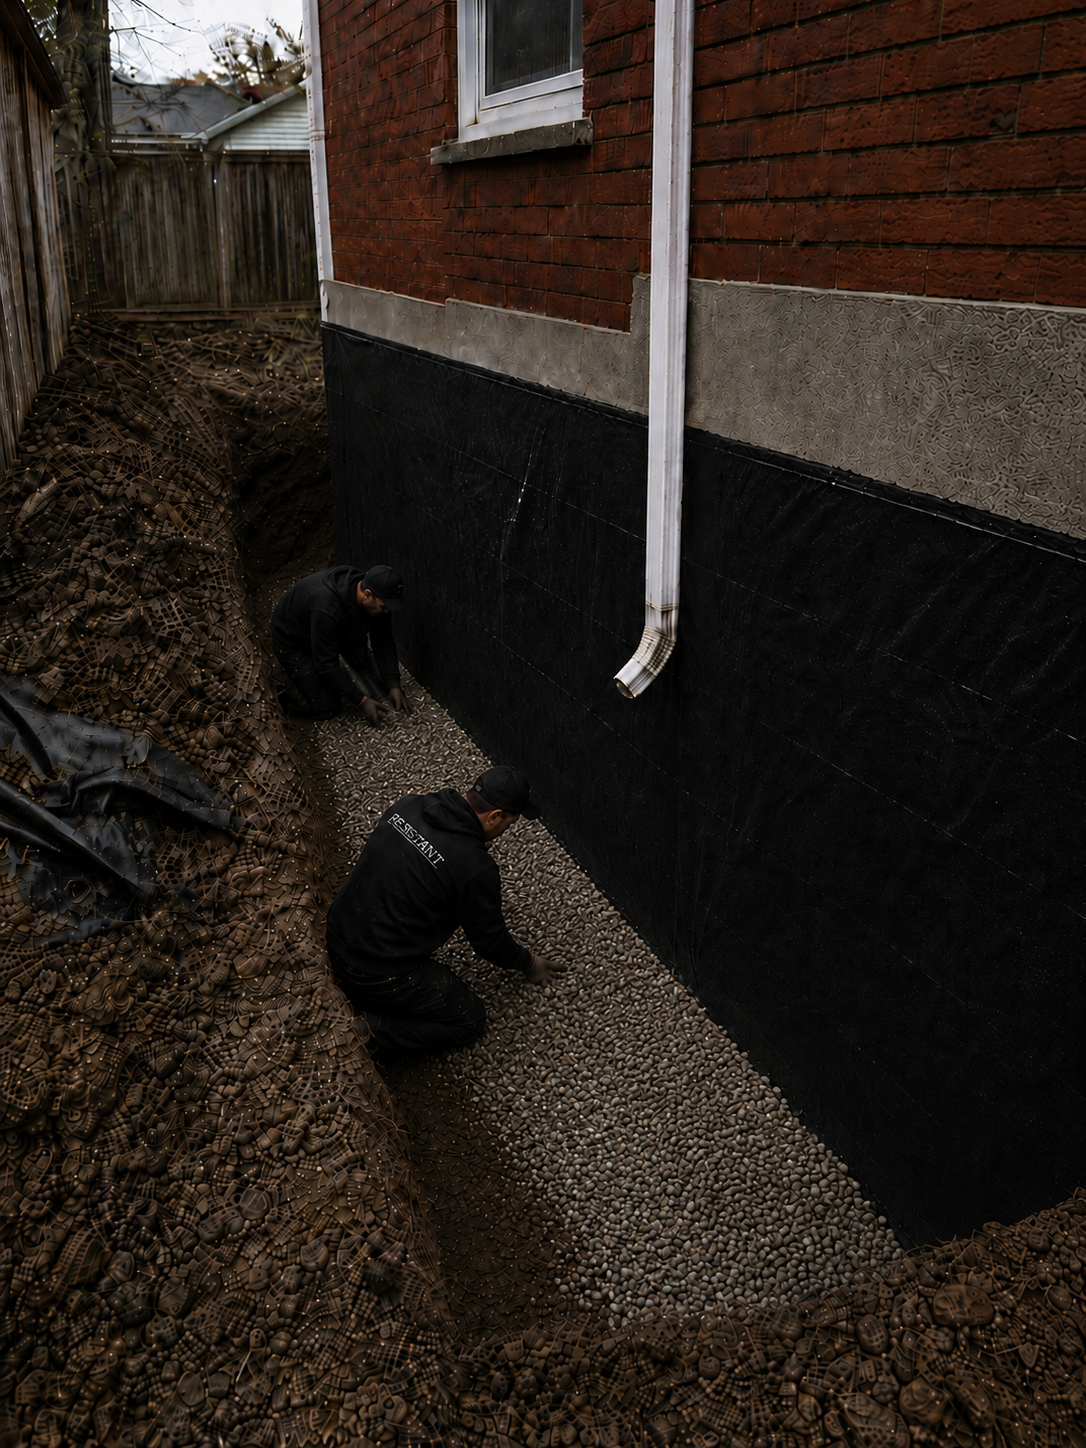
Placing Gravel Drainage Layer
Clean 3/4-inch crushed gravel is placed over and around the weeping tile, creating a free-draining layer. This gravel envelope allows water to flow easily to the drain pipe instead of building up against the wall.
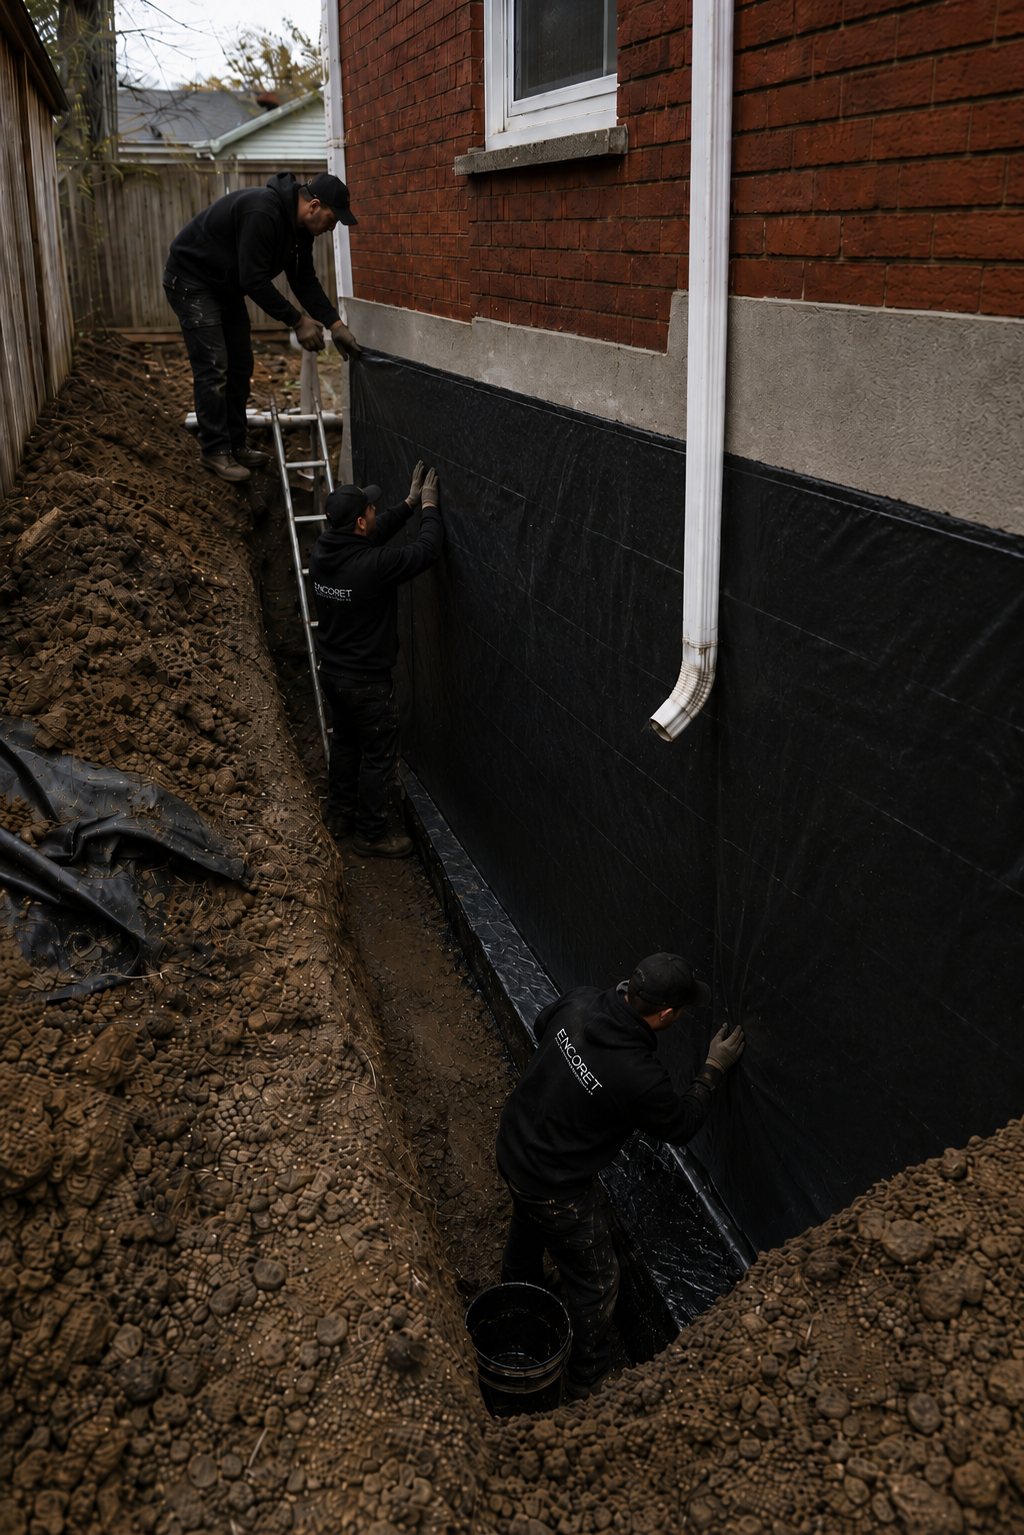
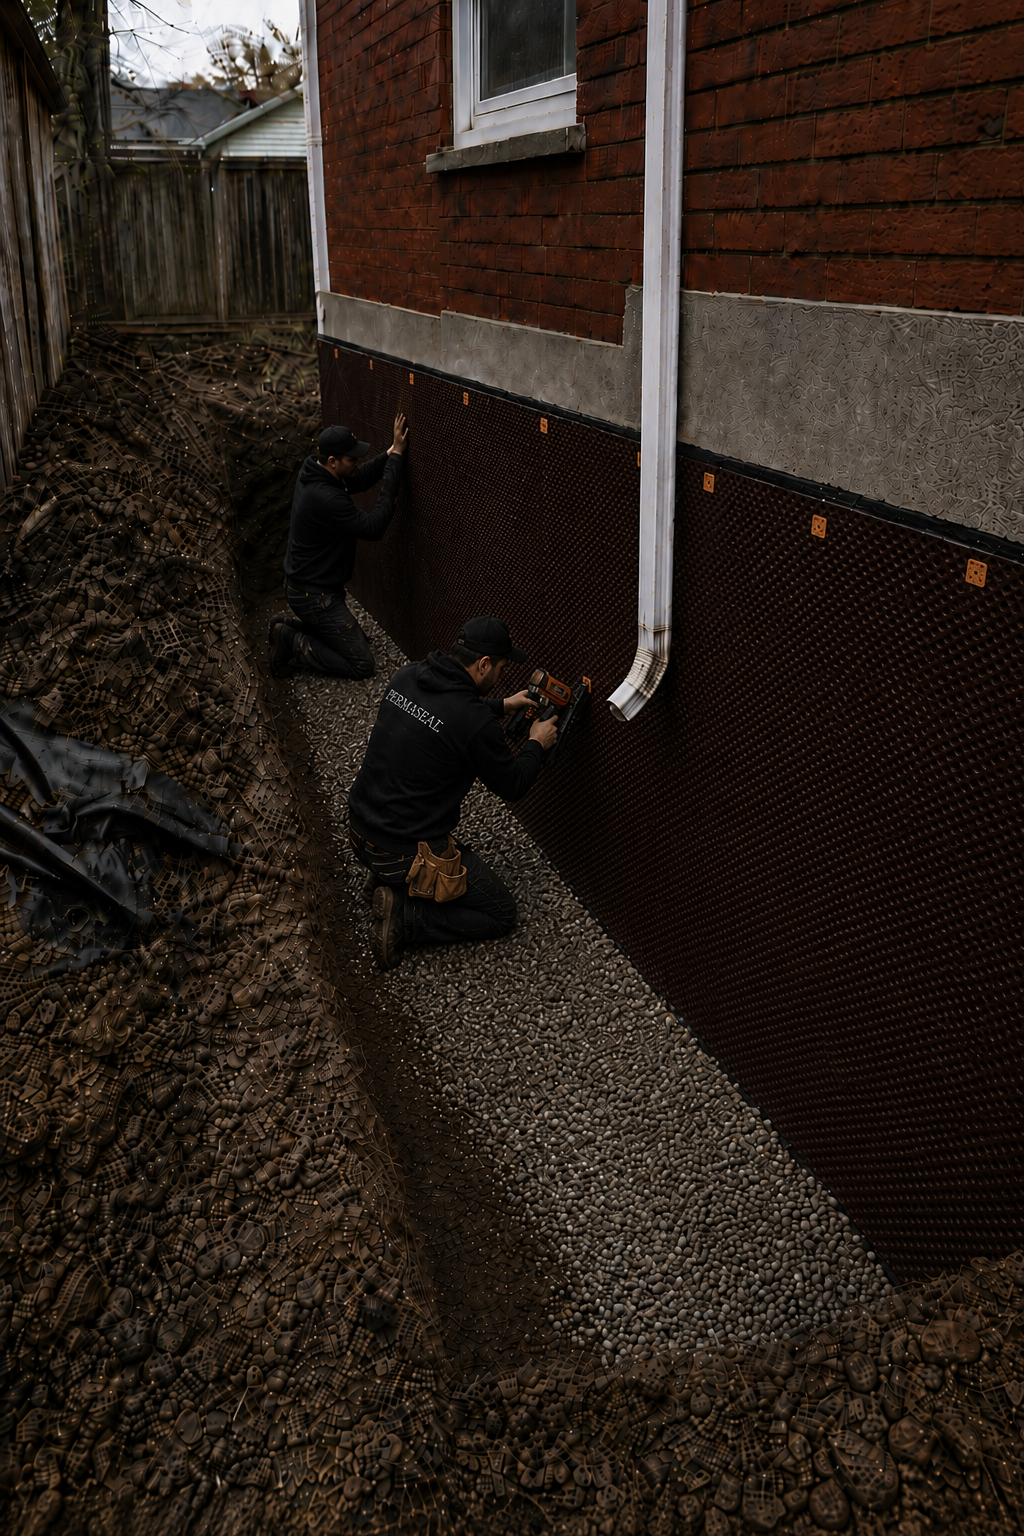
Installing Dimpled Waterproofing Membrane
A high-density polyethylene (HDPE) dimpled membrane is installed over the waterproofed wall. The dimples face outward, creating an air gap that channels water down to the weeping tile while protecting the liquid membrane from backfill damage.
The dimpled membrane also provides a thermal break and protects the primary waterproofing layer from root penetration and soil pressure.
Phase 5 of 5
Backfill & Finishing
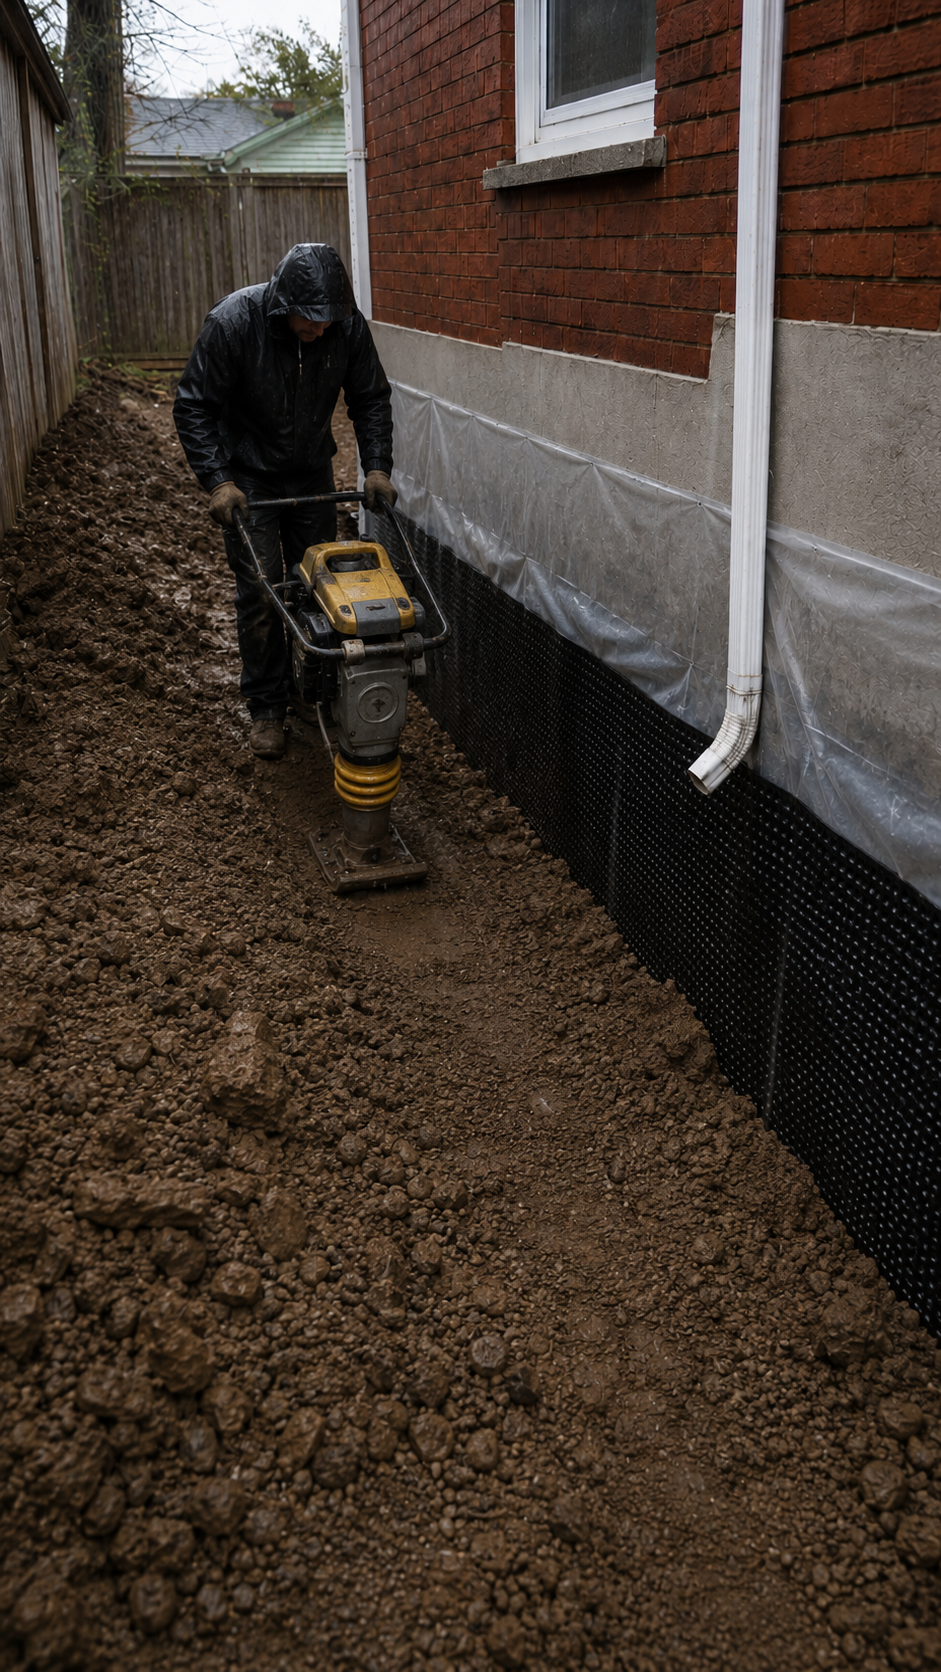
Backfill is done in 2-foot lifts with compaction between each lift. This prevents settlement that could create negative grading toward the foundation.
Backfilling the Trench
The excavated soil is returned to the trench in controlled lifts. Each lift is roughly 2 feet deep, allowing proper compaction between layers to prevent future settlement.
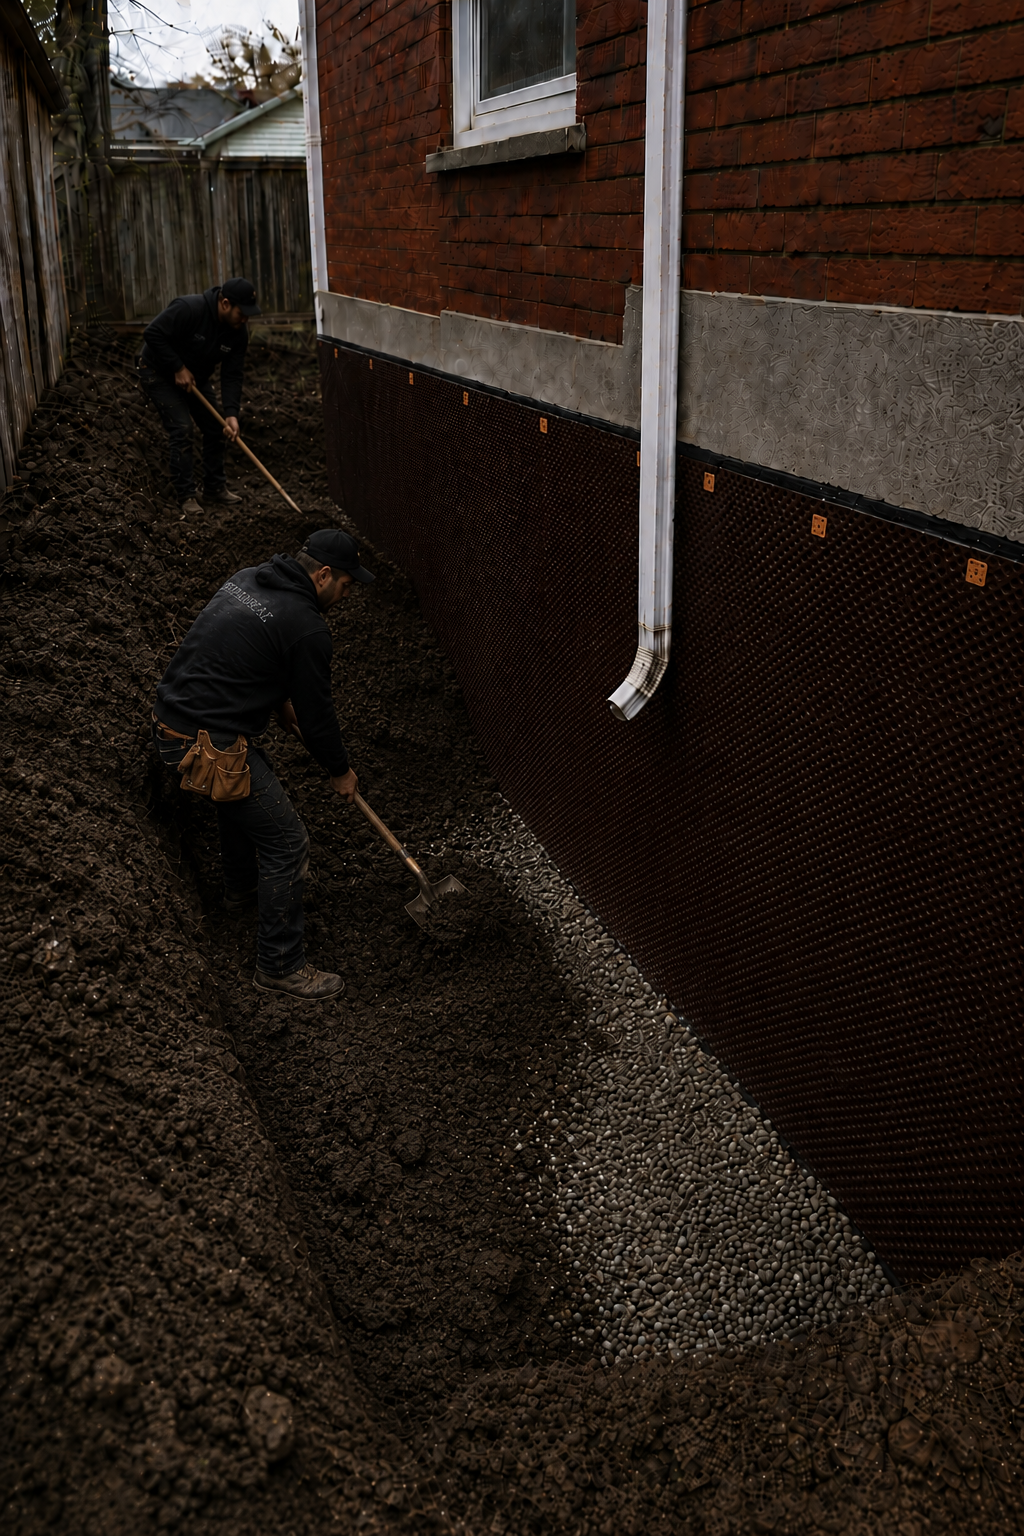
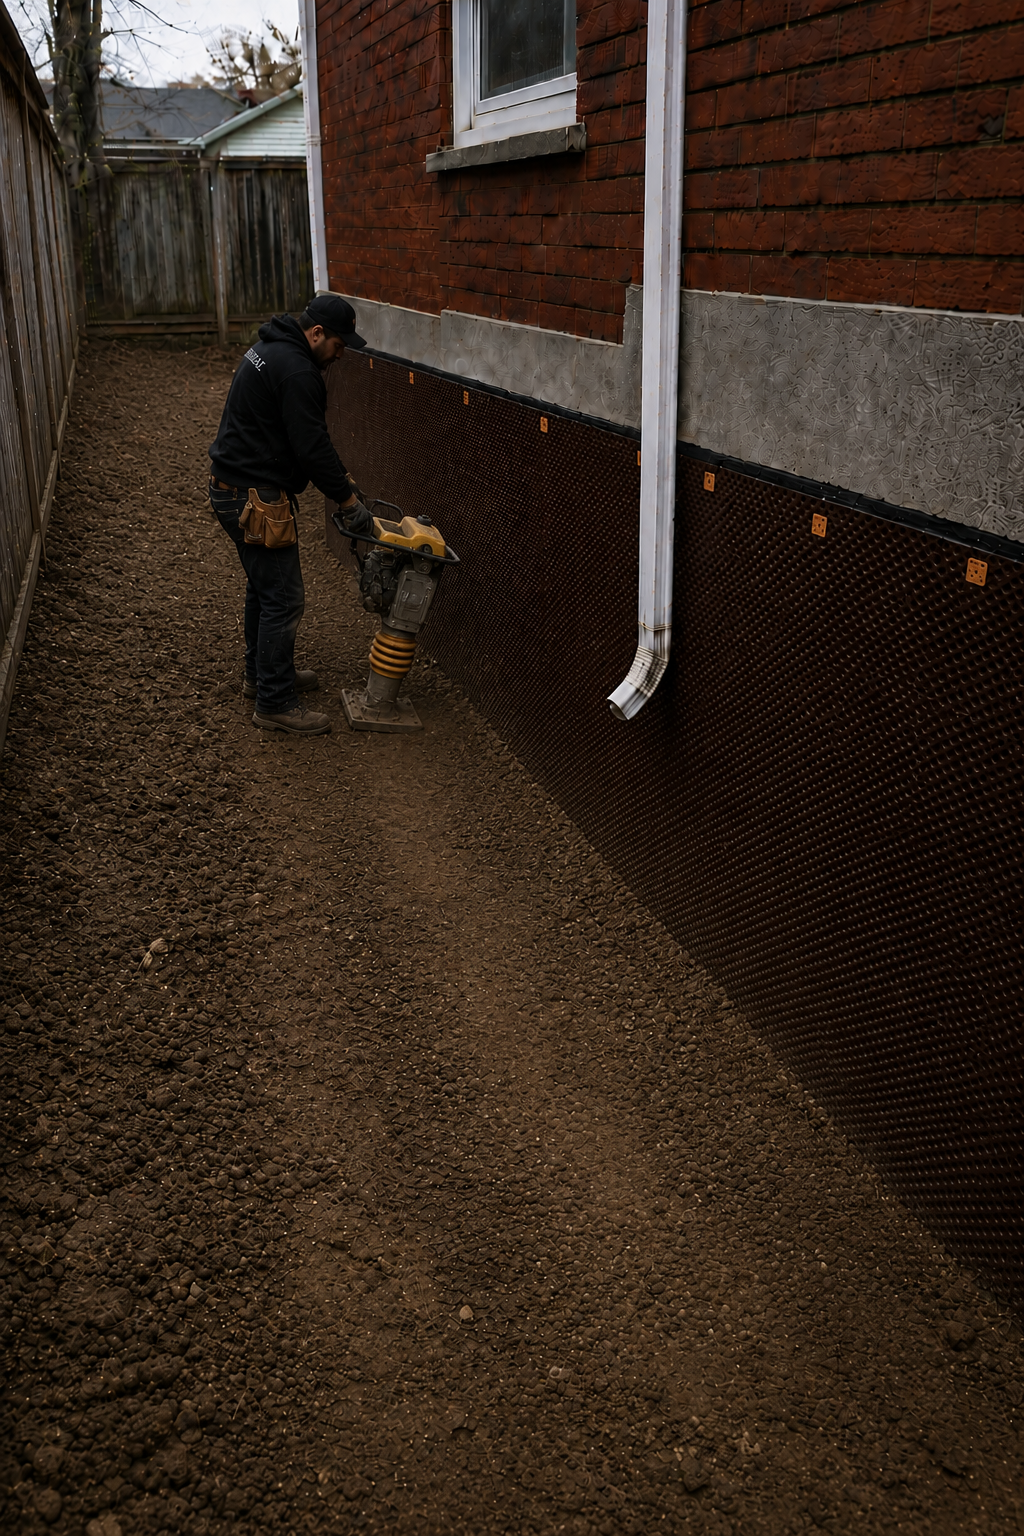
Tamping Soil Every 2 Feet
A plate compactor or hand tamper is used to compact each 2-foot lift of backfill. Proper compaction is critical — without it, the soil settles over time and creates low spots that direct water back toward the foundation.
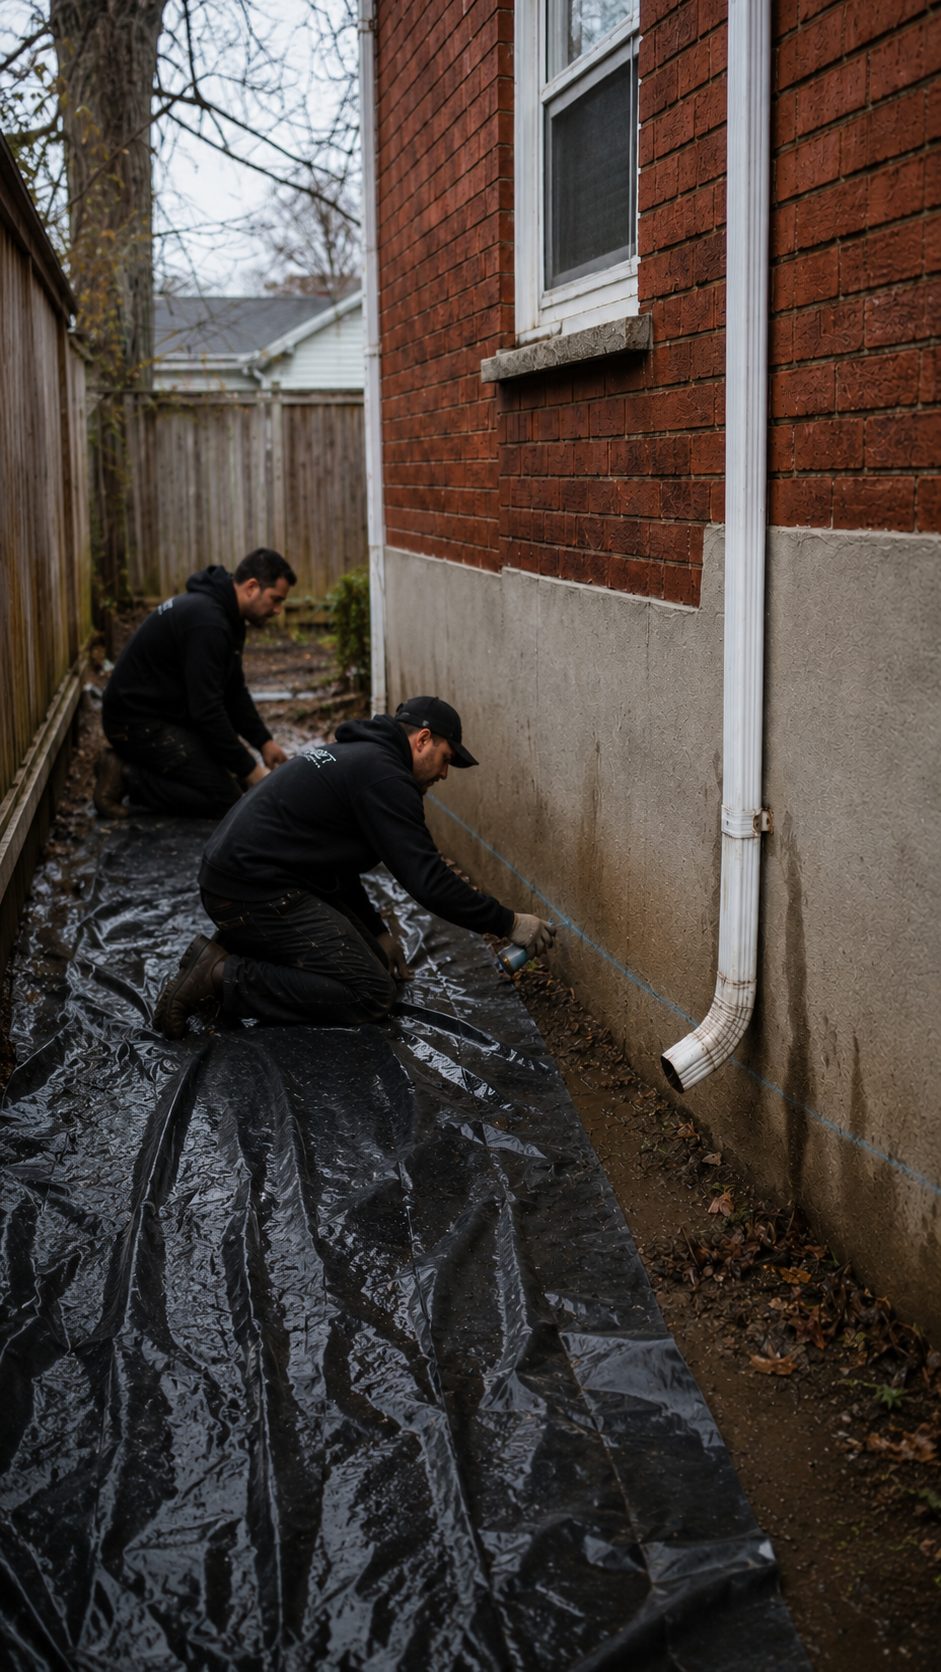
Install Poly Layer
A polyethylene barrier is placed over the compacted backfill near the surface. This extra layer prevents surface water from percolating down to the foundation, directing it laterally away from the house.
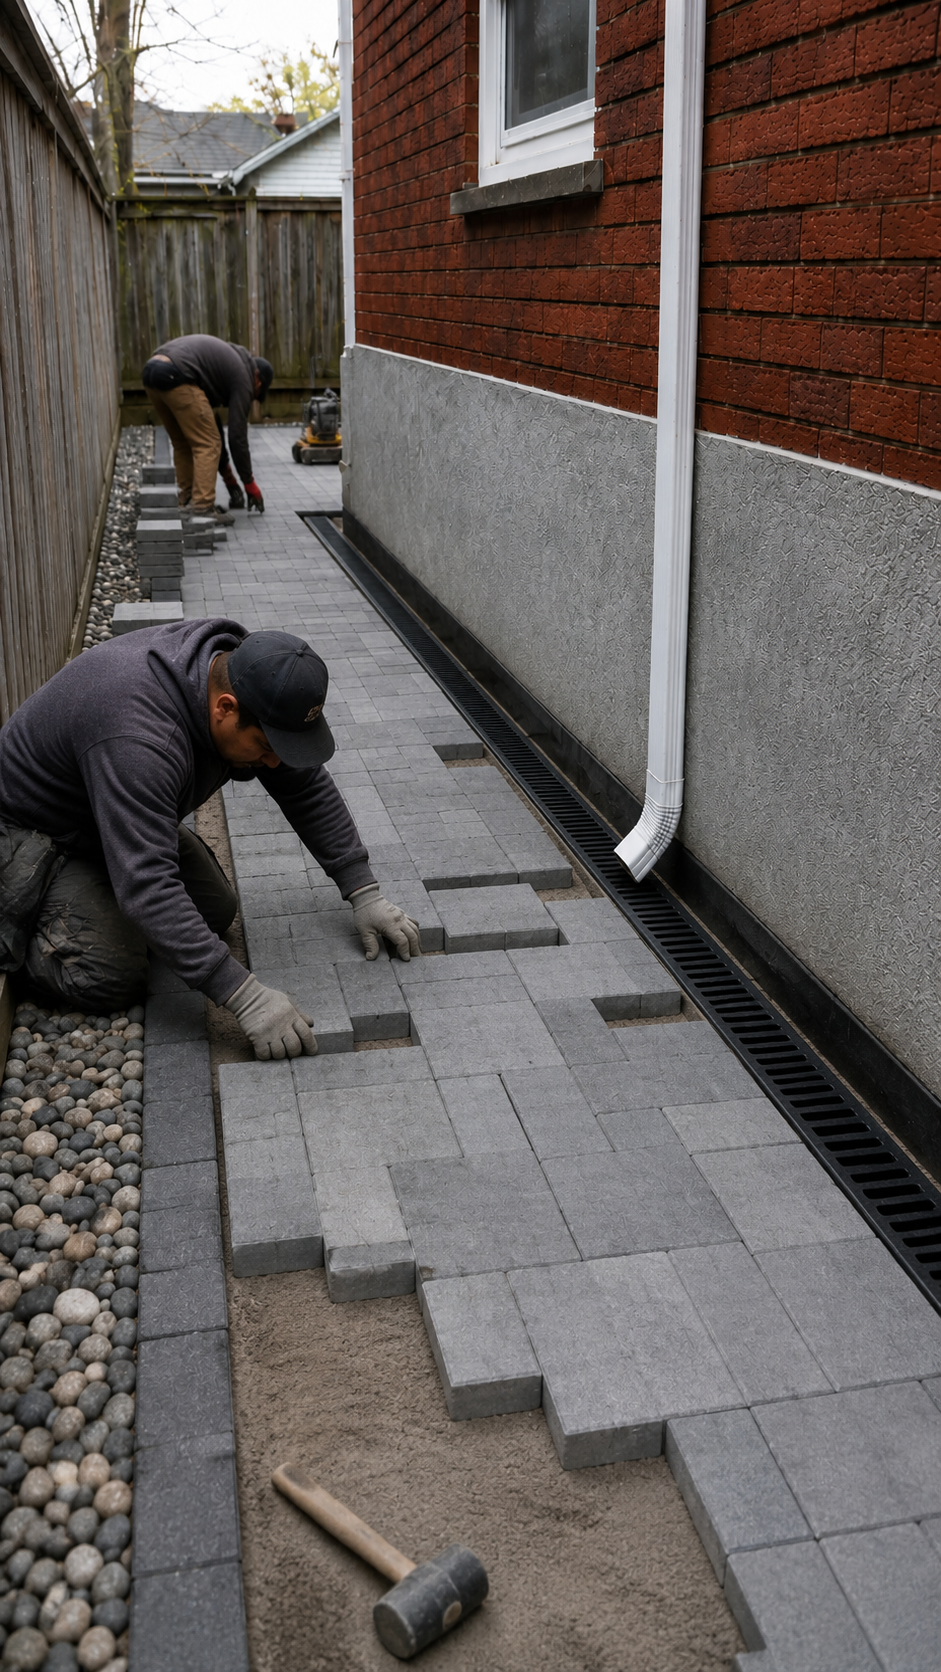
Interlock with Drainage Tile
The surface is finished with interlocking pavers or stone, incorporating a drainage tile underneath. This creates a clean, functional surface that directs water away from the foundation while providing a finished look.
Final Result — Dry Basement
The exterior waterproofing is complete. The foundation is protected by multiple layers: liquid membrane, poly vapor barrier, dimpled membrane, weeping tile, and gravel drainage — a comprehensive system that keeps your basement dry for decades.
Frequently Asked Questions
How long does exterior waterproofing take?
What is the difference between interior and exterior waterproofing?
How much does exterior waterproofing cost in Toronto?
Do I need a permit for exterior waterproofing?
What is a dimpled membrane and why is it important?
How long does exterior waterproofing last?
What is weeping tile and how does it work?
Can I waterproof just one wall instead of the whole foundation?
Why is soil compaction important during backfill?
What causes basement water leaks in Toronto homes?
Ready to Waterproof Your Foundation?
Work with one licensed, insured, WSIB-covered crew across Toronto & the GTA. Free walkthroughs, fixed milestone pricing, and a live app showing every stage.