Underpinning vs Bench Footing
Which Is Right for Your Basement?
Compare the two main methods for lowering a basement floor — mass-concrete underpinning and bench footing. Understand the cost tradeoff, floor space impact, and when to choose each method.
Quick Answer
Mass-concrete underpinning excavates beneath the existing footing and preserves every inch of floor space but costs $500–$800/lf. Bench footing pours a concrete bench against the wall — 30–40% cheaper at $300–$500/lf but sacrifices 12–18 inches of room per wall. Choose underpinning for maximum space; bench footing when budget is the priority.
Written by Pavel Vysotckii
BCIN-certified building designer & Quantity Surveyor · Updated June 2026
Side-by-Side Comparison
11 factors to help you choose the right basement lowering method for your Toronto home
| Factor | Mass-Concrete Underpinning | Bench Footing |
|---|---|---|
| Cost per Linear Foot | $500 – $800/lf | $300 – $500/lf |
| Floor Space Impact | Zero — excavates beneath existing footing | Loses 12–18" per wall (60–75 sq ft on typical semi) |
| Total Cost (25×40 Semi) | $65,000 – $104,000 (130 lf perimeter) | $39,000 – $65,000 (130 lf perimeter) |
| Timeline | 3–4 weeks (section-by-section excavation) | 2–3 weeks (faster pour, no alternating sections) |
| Disruption Level | Higher — hand excavation beneath existing footing | Moderate — concrete bench poured against wall |
| Best For | Maximizing floor space, rental units, resale value | Budget-conscious projects, storage areas, partial lowering |
| Engineering Complexity | High — structural engineer designs staggered section sequence | Moderate — engineer specifies footing dimensions & rebar |
| Structural Impact | New foundation beneath old — full replacement | Addition beside old — old footing remains |
| Permits Required | Building permit + structural engineer report (all cities) | Building permit + structural engineer report (all cities) |
| Durability / Lifespan | 100+ years — new engineered concrete foundation | 50–75 years — depends on original footing integrity |
| Resale Value Impact | High — legal basement apartment, full ceiling height | Moderate — functional space but reduced square footage |
Hybrid Approach Available
You can mix methods on the same project. For example, use mass-concrete underpinning on the front and rear walls (where living space matters) and bench footing on party walls or mechanical areas (where floor space is less critical). Your structural engineer must design the transition between methods.
Floor Space Impact: The Hidden Cost of Bench Footing
Bench footing creates a 12–18 inch wide concrete ledge along the interior of each wall. While this lowers the floor and adds ceiling height, it permanently reduces your usable floor area.
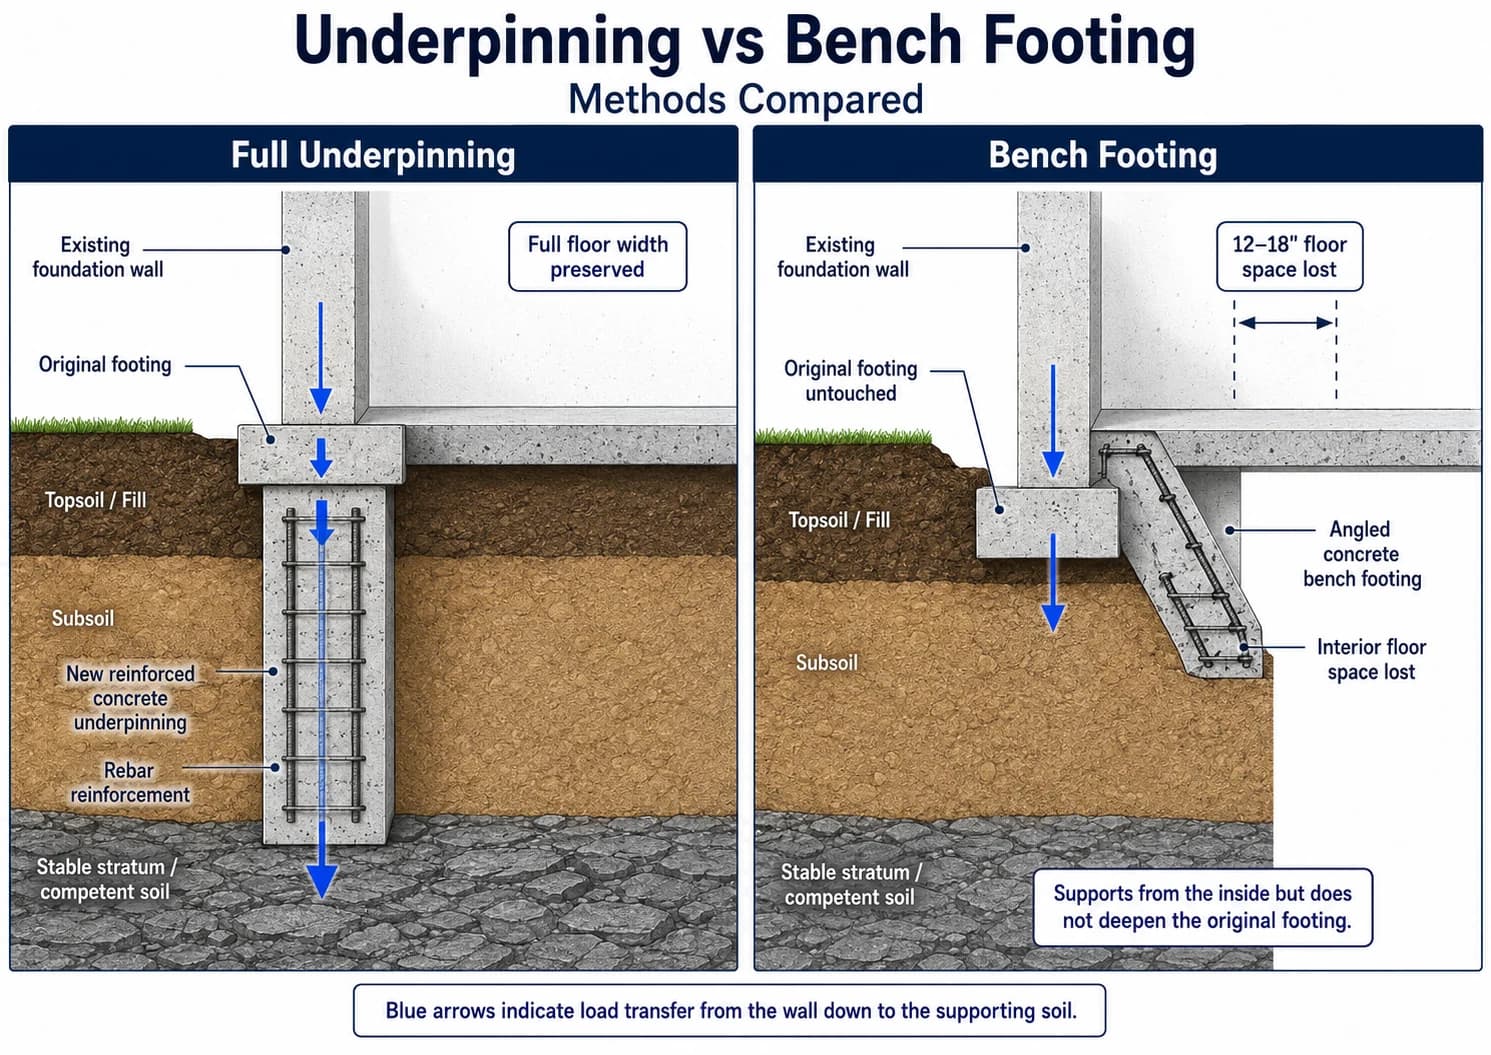
Full Underpinning
- Full floor width preserved
Bench Footing
- 12–18" floor space lost per wall
Blue arrows indicate load transfer from the wall to stable soil.
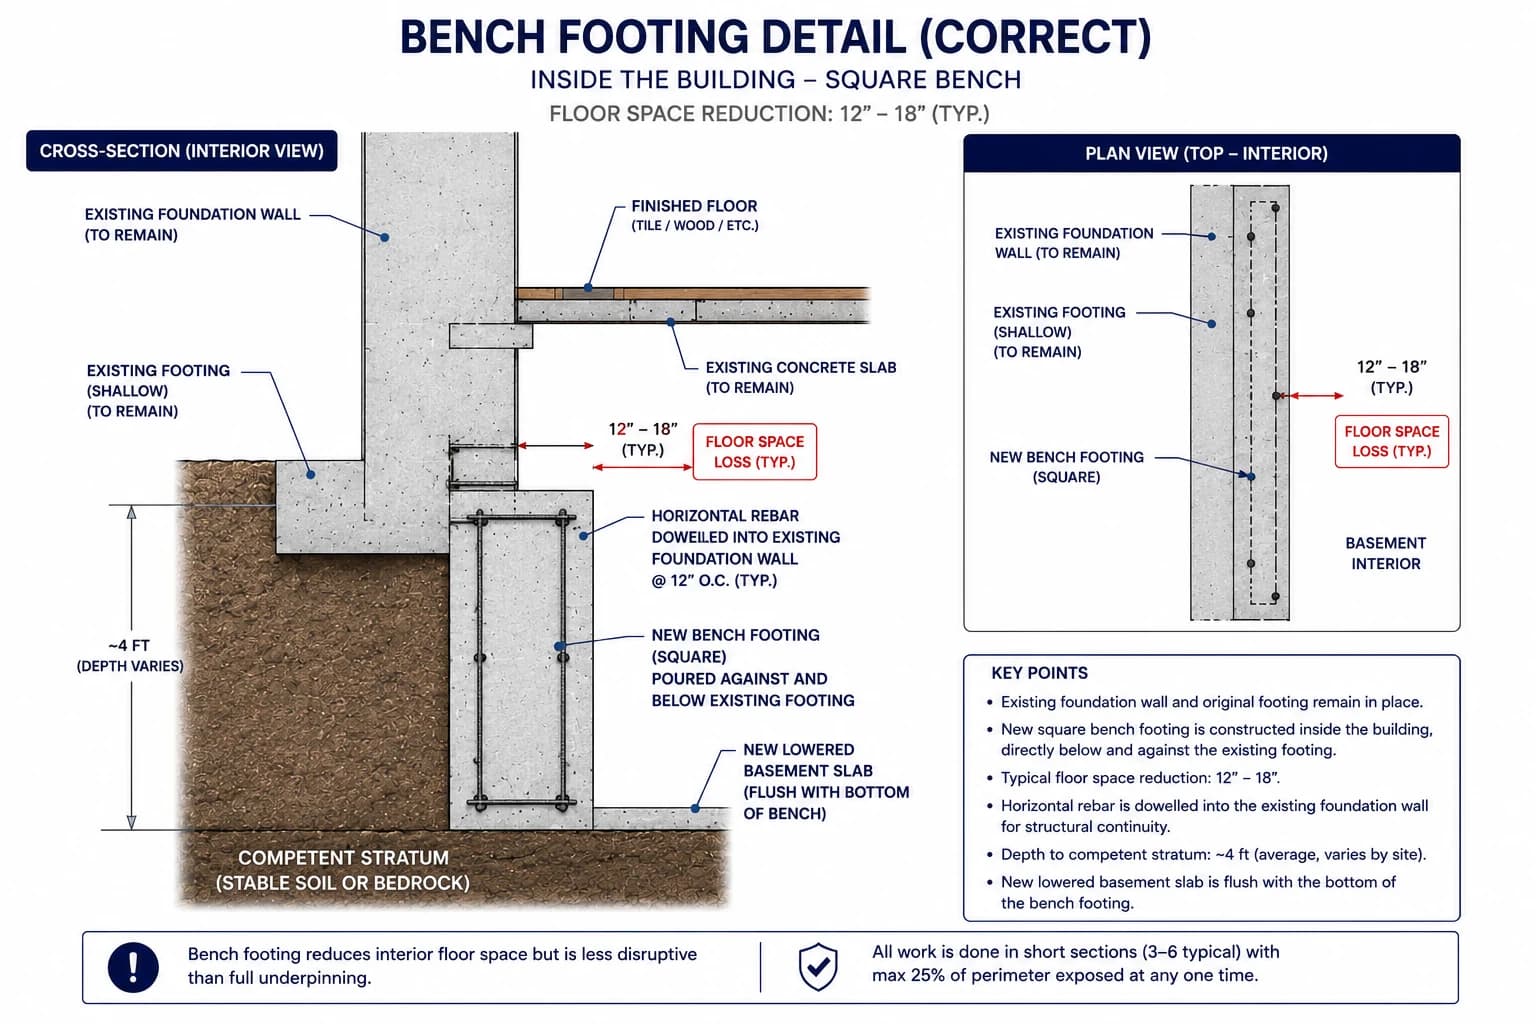
Key Technical Details
- 1Existing foundation wall and original footing remain in place
- 2New square bench footing is constructed inside the building
- 3Typical floor space reduction: 12"–18"
- 4Horizontal rebar is doweled into the existing wall for structural continuity
- 5Depth to competent stratum: ~4 ft (average, varies by site)
- 6New lowered basement slab is flush with the bottom of the bench footing
Bench footing reduces interior floor space but is less disruptive than full underpinning.
All work is done in short sections (3–6 typical) with max 25% of perimeter exposed at any one time.
Example: 25×40 ft Semi-Detached House
Mass-Concrete Underpinning
Original footprint: 25 ft × 40 ft = 1,000 sq ft
After underpinning: 1,000 sq ft (zero loss)
Bench Footing (15" wide on all 4 walls)
Front wall: 25 ft × 1.25 ft = 31 sq ft
Rear wall: 25 ft × 1.25 ft = 31 sq ft
Left wall: 40 ft × 1.25 ft = 50 sq ft (minus corners)
Right wall: 40 ft × 1.25 ft = 50 sq ft (minus corners)
Total loss: ~70 sq ft (7% of floor area)
After bench footing: 930 sq ft
Impact on Narrow Rowhouses
In a 15 ft wide rowhouse, losing 12–18 inches on both side walls means losing 2.5–3 ft of width across the entire basement. This is a 16–20% reduction in floor area — much more significant than in a wider semi-detached house.
Original: 15 ft × 40 ft = 600 sq ft
After bench footing: 12 ft × 40 ft = 480 sq ft (20% loss)
This floor area loss is permanent and affects furniture layout, room sizes, and rental value. If you plan to create a basement apartment or maximize square footage for resale, mass-concrete underpinning is the better long-term investment.
The Three Underpinning Pour Finishes — and Why They Matter
Every underpinning section has to make contact with the underside of your existing footing. There are three standard ways to finish that top of pour, and the choice affects the wall–floor joint you live with and how the waterproofing membrane is detailed. Your structural engineer specifies the finish on the permit drawings — but it's worth knowing what each one means before you compare quotes.
Non-Shrink Grout Pack (Dry Pack)
The new section is poured to stop roughly 2–3 inches below the existing footing. Once the concrete cures, the gap is rammed full of non-shrink grout to lock in load transfer. This is the most common engineered detail in Toronto. It leaves a horizontal joint line high on the wall — the dimpled waterproofing membrane should lap over that joint so any seepage path is directed down to the weeping tile, and the wall–floor joint below stays a standard cove detail at the new slab.
Overpour (Corbelled Ledge)
The form is built wider than the existing wall, so the new concrete projects a small ledge into the room at the top of each section. Load transfer is direct, with no separate grouting step. The trade-off: the ledge interrupts the wall plane, so framing has to be furred out past it, and the membrane must be stepped around the ledge — an extra waterproofing detail at exactly the height where moisture tends to travel. Usually accepted in storage or mechanical areas where the ledge doesn't matter.
Flush Pour
The form face is set flush with the inside of the existing foundation wall, and concrete is poured tight to the underside of the footing through a window in the formwork. The result is a single flat wall plane from joists to slab: the simplest framing, and a clean, continuous membrane run straight down to the wall–floor joint and weeping tile. It demands the most careful forming and consolidation, so confirm your quote prices it explicitly.
Which one will you get? On most Toronto projects the engineer's standard detail is a grout pack. A flush pour is common where the basement is being finished to living-space standard, because the flat wall plane simplifies both framing and the waterproofing detail. Ask which finish is on the drawings before you sign — it affects the finished room more than most homeowners expect.
Cost Comparison: Two Ways to Measure
Quotes are given by linear foot (perimeter), but the real value is in cost per square foot of finished space.
Per Linear Foot
Mass-Concrete Underpinning
$500 – $800 /lf
Bench Footing
$300 – $500 /lf
30–40% cheaper per foot
Per Square Foot of Finished Space
Mass-Concrete Underpinning
$65 – $104 /sq ft
Based on 1,000 sq ft preserved
Bench Footing
$42 – $70 /sq ft
Based on 930 sq ft remaining (70 sq ft lost)
How to Convert Linear Foot to Square Foot Pricing
Step 1: Calculate your perimeter. A 25×40 ft semi has a perimeter of (25 + 25 + 40 + 40) = 130 linear feet.
Step 2: Multiply by cost per linear foot. At $650/lf average, total cost = 130 lf × $650/lf = $84,500.
Step 3: Divide by floor area.
• Underpinning: $84,500 ÷ 1,000 sq ft = $84.50/sq ft
• Bench footing (at $400/lf): $52,000 ÷ 930 sq ft = $55.91/sq ft
This per-square-foot metric accounts for the floor space tradeoff and helps you compare true value, not just upfront cost.
Which Method Is Right for You?
Use this decision guide to choose the best approach for your basement project
Choose Mass-Concrete Underpinning When
- You want to maximize usable floor space
- You are creating a legal basement apartment or rental unit
- Resale value and marketability matter
- You have the budget for the premium solution
- You need full 7–8 ft ceilings throughout
- You want a 100+ year foundation lifespan
Choose Bench Footing When
- Budget is the primary constraint (30–40% cheaper)
- You only need to lower 1–2 walls, not the full perimeter
- The space will be used for storage, laundry, or mechanical rooms
- Floor area reduction is acceptable for your use case
- You want faster project completion (2–3 weeks vs 3–4 weeks)
- The basement is not being converted to living space
Still Not Sure? Talk to a Structural Engineer
Every home is different. Soil conditions, existing foundation integrity, intended use, and budget all affect the best choice. A licensed structural engineer can assess your specific situation and recommend the optimal method — or a hybrid approach combining both.
Get a free assessment with your quoteFrequently Asked Questions
Is underpinning the same as bench footing?
How much does underpinning cost vs bench footing in Toronto?
Does bench footing reduce my floor space?
Can I use bench footing on one wall and underpinning on others?
Which method is better for a basement apartment?
Do both methods require an engineer?
How long does each method take?
Which method adds more property value?
What are the three pour finishes used in underpinning?
Which method suits a semi-detached party wall?
Can you switch between underpinning and bench footing mid-project?
Ready to Lower Your Basement?
Get a free estimate from RenoNext. Transparent pricing and expert guidance on choosing the right underpinning method for your home.